
Dubsado forms are slightly limited when it comes to available fonts. Being able to add your own fonts to your proposals is a game-changer. It’s important to give your clients a seamless experience with your brand. This quick tutorial will help you install Adobe fonts to your Dubsado Proposals in less than 10 minutes.
This tutorial is going to focus on how to add Adobe fonts to your Dubsado forms, if you’ve got your own custom fonts you’d like to install, check out this tutorial or this one for Google Fonts!
Just a note before we start, you may find in the edit mode of Dubsado the fonts aren’t working. However, they should show in the preview mode.
Step 1 – Pick out your Adobe fonts
If you’ve already chosen your fonts for your brand you can skip this step. If not, head to Adobe fonts and pick some out!

I’ve chosen Poiret One as my font for this example. You’ll need to activate the font on your Adobe account using the toggle in the top right. Next you’ll need to Add the font to a Web Project

Once you you click Add to Web Project (top right), you’ll find get a pop up.


Step 2 – Embed your Adobe fonts
Next, you’ll want to copy the embed font code and add it to your Dubsado form!
Once you’ve got your code, it will look similar to this:
<link rel="stylesheet" href="https://use.typekit.net/pze1mye.css">
You can now add this code to a code block in your Dubsado form. I’d recommend adding keeping this block at either the top or bottom of your form so you can easily find them.
This is HTML code rather than CSS, therefore it needs to be in a HTML block.
Step 3: Assign your Adobe fonts
Now that your fonts are installed in your Dubsado form, you’ll need to tell your form where to display your fonts! Copy the CSS code below into the CSS editor, which you’ll find under font styling and get styling! Note that the code is wrapped in style tags!
<style>
/* =========================
   FONTS STYLES
   ========================= */

.dubsado-form, .dubsado-form p {
	font-family: 'poppins', sans-serif;
	font-weight: 400;
	font-style: normal;
	line-height: 1.8;
	color: #6e6e6e;
}

.dubsado-form h1  {
	font-family: 'Poiret One', sans-serif;
	font-weight: 600;
	color: #000000;
	font-size: 4em;
}

.dubsado-form h2  {
	font-family: "Playfair Display", serif;
	font-weight: 600;
	color: #000000;
}

.dubsado-form h3 {
	font-family: "Poppins", serif;
	color: #000000;
}

.dubsado-form h4 {
	font-family: 'Homemade Apple', cursive;
	font-style: normal;
	color: #000000;
}

b,
strong {
	font-weight: 600;
}

</style>
The code above will style your tags within Dubsado’s text formatter, as well as in any HTML code you in custom code blocks.
Step 4: Using Adobe fonts within Dubsado’s native text boxes
Now that your fonts are installed and set up, you can use them within Dubsado’s native text boxes.
Once you’ve added in a text box into your form you can apply your styles using the Formatting Options > Paragraph Format.
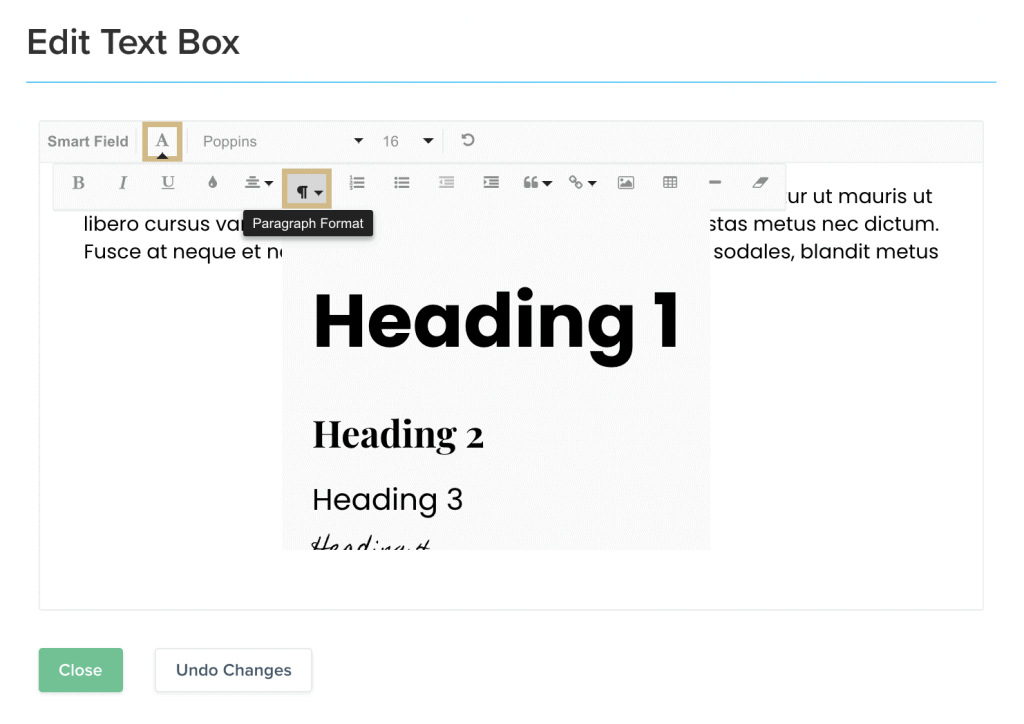
Any additional formatting you apply within the text boxes will override your CSS styles. Therefore, if you’d like to use the paragraph and heading styles, it’s a good idea to clear any default formatting such as font face, size and colour. You can do this with an easy click of a button –Formatting Options > Clear All Formatting.

Step 5: Using Adobe fonts within code blocks
Once your font is imported and CSS font code is added, you can also use it within code blocks to define fonts within HTML elements. For example, anything you wrap in <h1> tags, will automatically take your H1 style.
<h1 >This is a heading 1 with custom font - Poiret</h1>
You may also want to assign a font to a class. This code would target any element with the class Poiret.
.poiret {
font-family: 'Poiret One', cursive;
}
To display the font using the above class code you can simply add a code block with and assign any HTML the class.
<h1 class="poiret">This is a custom font - Poiret</h1>
<p class="poiret">This is a custom font - Poiret</p>
Step 6: Fall Back Fonts
It’s a good idea to include at least one fall-back font. A fallback font will display if for some reason a browser cannot load your font.
For example, this code below will first try to use Poiret One, if it is unable to use Poiret then it will try to use Open Sans, and then Arial. If it cannot use any of those fonts, it will default to the browser’s default sans-serif font. Sans-serif simply means fonts without the decorative serifs.
.fr-dropdown-menu h1, .jb-form h1 {
font-family: ‘Poiret One’, Open Sans, Arial, sans-serif;
}
Step 7: Font Sizes
There are two kinds of sizing options, absolute (px) and relative. It tends to be better to use relative sizing as your fonts will adapt based on the screen size. For that reason, I tend to use relative sizes as my size measure.
There are a number of relative sizing options, here are a few:
- em – 1 em is equal to 1x the default browser font size
- vw – browser width
- vh – browser height
For more information on sizing, this W3Schools article is a great place to start!
Things to know
- The steps above would need to be repeated across every form on your Dubsado account. I highly recommend you set up a reference form that you can duplicate each time you need to add a new form.
- As a general rule, your headings should decrease in size and importance from H1 > H6
- Dubsado only allows us to use CSS in lead capture forms, questionnaires, and proposals. You cannot add code blocks to contracts, sub-agreements, or schedulers – therefore you can not add custom fonts to these.


